Monday, 16 April 2012

BERRY DELIGHT

I just recently purchased a birthday gift for my niece, Becka.  She had asked for a blender, as she didn't have one yet.  This post is dedicated to her to give Becka some ideas for the use of her blender. I'm sure, you, the reader will get plenty of ideas on your own too.

Here's some ideas...
salad dressing
smoothies
"ice cream"
milkshakes
daiquiris
pina coladas
margaritas
and fruit sauce,
among many other ideas, these are obviously just a few.

After a Zumba workout today I needed something to eat to get my energy levels back up.  I had a couple of packages of berries in the fridge to use up, so I came up with this yummy Berry Delight. It's all raw and totally delish.  This dish can be used for a meal for one or dessert for two. Double the ingredients and use for a dessert for a gathering.  Oh, and by the way, this is super easy.

BERRY DELIGHT


INGREDIENTS

1 lg pkg raspberries (about 12oz or 340g)
1 lg pkg blackberries (about 12oz or 385g)
2 medjool dates
1/4 cup or so of frozen mango
splash water


INSTRUCTIONS

In a blender, blend up a handful of the raspberries with the dates, frozen mango and the water.  You can add more or less of the water to reach desired sauce consistency.  I like it quite thick, so I only used a splash of water.  Blend until smooth with no more lumps.
Wash and pour all of the fresh berries into a bowl.
Pour your fruit sauce over the top of the berries.
Done!!! Easy and yum, yum, yum.
Enjoy.

Any berries can be used for this recipe.  Only have strawberries and blueberries, try those. I'm sure any berry combination will turn out just a tasty.  The colour might be a bit different but the taste will still be there.
You can also use a combination of fresh and frozen berries for the sauce.  No need to use the mango.  I threw in the mango for the extra creaminess to the sauce.  Feel free to use frozen and fresh raspberries for the ultimate raspberry delight.  Mmmm.  If you happen to not have any dates, they can easily be substituted with honey, although more fruit or frozen fruit may need to be added so the sauce doesn't turn out too runny.  And heck to make this recipe even easier, throw all of the ingredients in a blender, add a little more water and make the berry delight smoothie. Wow!


I had forgotten to take a picture.  I was so excited to be eating this creamy berry creation, that I had forgot, so in the pic, the bowl is already half empty. It was quite a full bowl of yumminess.  I didn't even get a chance to give you a pic of the ingredients, I ate is so fast!  Oops:}

Eat Well.
:)


Friday, 13 April 2012

YOUNG THAI COCONUT

young Thai coconut
OMG!!!! If you like coconut, or even if you don't like coconut, you've got to try a young Thai coconut.
They look like this.....


Kind of spongy on the outside but yummy coconutty inside.
I will explain....


whole coconut


In the picture above is a whole coconut that you would see growing on a coconut tree.  Green on the outside.  A Thai coconut basically is the green part cut away.  The hard "brown" coconut shell is the next layer and finally the coconut meat and the coconut water.  
In a young Thai coconut, the meat can be in a very thin layer almost jelly like or it can be a little bit more meaty as the coconut could have a nice layer of coconut meat inside.  It all depends on how young the coconut is.  You can't tell by looking at one when purchasing.  
They are soooo incredibly tasty.  Full of flavour.  Not like a normal hard mature brown coconut.  Yes the meat is tasty too, but most of the coconut water has been absorbed by the coconut itself and the meat tends to be quite thick and hard and difficult to get out of its shell.  Still tasty, but not the same as a young Thai coconut. There is a ton more coconut water inside a young coconut too.  It's pretty much full to the top, where in a mature coconut you could probably get about a 1/4 the amount of water in them.  Not only do they taste good but coconut water is excellent for hydration.  So after a night out drinking with friends, have a sober person open up one of the young coconuts and down the water.  No hangover in the morning.  Bonus!! Also, these coconuts contribute to our bodies good HDL cholesterol, as per popular belief years ago saying that coconuts are all bad fat. In fact they have very good and healthy fat.  

This is how to open a young Thai coconut.....
I open mine on my kitchen counter on a big cutting board.


The first time I bought one here at my local grocery store (I paid $2.49 for it), and opened it and tasted it, I couldn't believe how yummy it was.  Go and try one for yourself.  Really good!!!  I can't tell you enough how tasty they are. You really have to take my word for it and try for yourself. 
The first one I opened I drank the water and scooped out all of the meat and just devoured it all.  Mmmmmm.  I did share a bit with my husband.  He is very anti-healthy food, but he really thought this coconut was very delicious too.
I have since bought  more and have made a pineapple and coconut smoothie, a coconut berry smoothie that I went crazy with and added everything but the kitchen sink including gogi berries, cocoa nibs, cocoa powder, cashews, frozen strawberries, frozen raspberries, bee pollen, maca root powder and greens powder and i also made a green smoothie using the coconut water and meat, spinach, greens powder and frozen mango.  I can just taste it now. Mmmmmm.
I'm planning on buying many more of these young Thai coconuts and making lots of  tasty meals and desserts with them.  
Try one and let me know what you think.
Eat Well.

Wednesday, 11 April 2012

BRING AN APPETIZER

Your going out to a get together with friends or family.  They've invited you for dinner.  You are asked to bring an appetiser.  This one I've come up with I have been making for a few years now.  My father in law loves them.  Wraps filled with colourful crunchy vegetables, feta cheese and creamy Greek dressing all wrapped together in a rice paper wrap.  Best of all they're low cal, and full of vitamins from all of the fresh raw veggies.  Although these are a little time consuming, they are so worth it.  Get the husband involved, the kids. Why not?  When they've been part of the creation, they enjoy the food more.  If there are any leftover, they make a great lunch for the next day.

RICE PAPER WRAPS

INGREDIENTS

A variety of straight cut veggies. I use......
red pepper
yellow pepper
carrot
cucumber
sometimes I use jicama too. (its a vegetable that looks somewhat like a potato with light brown skin, white inside and tastes a little like a pear)
feta cheese (cut into strips)
arugula or other fresh herbs of your liking
Renee's creamy Greek salad dressing
rice paper (found in the international section of your
grocery store)
water (for soaking the rice paper)


INSTRUCTIONS


Set up your station like an assembly line.
I use two plates for soaking my rice paper in water until it is pliable enough to roll, but soft enough to eat.
I set up my filling ingredients and have a plate ready for completed wraps.  Also i have some extra water standing by in case I run short. The dish towel is used for my wrapping to absorb excess water from the rice paper.


So, now that we are all ready, let's go!
First lay your rice paper in the dish of water. You can get a second one soaking as well once you get going and are comfortable enough.


Let the rice paper soak for about 30
seconds or so. You can check to see
if it is pliable enough by touching  it                                                
with your fingers. Once it is soft enough, gently pick it up with two hands and spread onto the dish towel.


Now, fold it in half, so it looks like a
half moon.


Start adding your filling ingredients one at a time.
First add the Greek salad dressing.


Then add the feta cheese making sure
some of it is placed beyond the folded
rice paper wrap.                                                          


Continue adding all of the vegetables and arugula.
Making sure to place them beyond the rice paper only at one end, and as evenly as possible. No worries about the veggie ends inside the rice paper wrap, they will be covered and no one will see them.


Once finished, fold the bottom of the
wrap over the fillings.


Then fold over the left side of the rice
paper wrap.


Now, holding the bottom of the wrap in toward the filling, roll the wrap together towards the right side. You may need to add a little bit of pressure to make sure everything stays in place.  The wrap my be a bit sticky, but that's what you want.
The wrap would fall apart without the
stickiness.  Continue to roll to the end of the rice paper.


Oh, they're so pretty.  Now layer on a brightly coloured plate and your done.  You might want to eat one to "test" it.
Be sure to cover tightly with plastic wrap until ready to serve as these can dry up easily.
Enjoy.


You can try any variations you like.  For example Thai wraps with Thai garlic chili sauce and peanut butter and coconut. Or Chinese wraps using bean sprouts and nappa cabbage and I don't know.... maybe plum sauce.  Have fun and experiment.  Leave me a comment and let me know your creations.

Eat Well.
:)

Monday, 9 April 2012

EASY CHOCOLATE TOFU CAKE

This will be your next favourite cake.
It's super easy to make and only requires 3 ingredients.
It's become my favourite in a pinch recipe.
I made it for my nieces birthday cake.  No one in the family knew it had a "secret ingredient" in it.
It's soo good.  You'll be surprised at how not tofu-ee it really tastes.  Just regular chocolate cake. I promise!!
You will not need to add in any oil, or eggs.  The tofu covers all that. You'll be missing out on the cholesterol filled egg yolks and fattening oil. Although I haven't tried it yet, I'm sure any flavour of cake mix will work just fine. This recipe is vegan and vegetarian.

EASY CHOCOLATE TOFU CAKE


INGREDIENTS

1 box any brand chocolate cake mix (i used super moist devil's food)
1 300g pkg silken tofu
1/2 to 3/4 cup water


INSTRUCTIONS

Remember this is EASY.
Spray your desired baking pan or line cupcake pan with paper liners.


Pour contents of cake mix into food processor.
Add in tofu.

Process until combined.


Add 1/2 cup water and process again.


Continue to add a bit more water in between processes until desired consistency is achieved.
Pour into baking pans or cupcake pans.


Bake according to box directions.


This is the end result. Now take out of pans and let completely cool on a wire rack.


At this point, you can turn these cakes into a birthday or other occasion cake or if making cupcakes eat one warm to make sure they are "okay" for your family to eat.
I made an Oreo cookie cake for my nieces birthday.  I used the recipe from the Kraft Kitchens cook booklet. The filling is tasty but terrribly fattening and calorie loaded.
Next recipe I will probably look for a vegan/vegetarian filling. The chocolate glaze is just butter and chocolate melted and spread on top layer. Then put in fridge to harden.
Oreo Cookie Cake
Do you have a favourite cake/cupcake recipe you'd like to share? Leave a comment.
I'd love to hear from you.
Eat Well.


Saturday, 7 April 2012

BRING A SALAD

You're invited to a dinner with family or with friends and you were asked to bring a salad. You don't have a lot of time so are ready to go to the store to pick up a prepared salad ready to go.  That's fine and dandy, depending on what kind of salad is purchased.  I prefer a salad with some cheese or nuts or both in them.  My favorites are a Greek salad with feta cheese, cucumbers and olives  and a goat cheese salad with mandarin oranges and almonds. Yum! But they can be costly and the dressings that are provided are high is fat, sodium, and sugars. In case funds are short, I've got a couple of salad ideas here that are quick, easy, using foods you probably already have in your cupboard or fridge and they actually taste good. But here's the kicker... they are healthy too.  Low on calories, fat, sodium and price. Minimal effort are all they take and they make a nice presentation.  Use one of your fancy bowls and you're set.  It'll look like it took you all day to prepare.
Since I've been on this raw kick lately, the first salad is all raw, the second salad is about half raw.  Also they are vegetarian, vegan and gluten free.  For all of the skeptics out there, just because a recipe says raw or vegan or vegetarian, doesn't mean it tastes bad or different or "healthy".  Give these a try, I guarantee you'll like them.

I made this carrot salad one evening last week when I wanted something light but filling for dinner.  My husband loved it and couldn't say enough about how good and fresh it tasted. We had a little bit left over from our meal so the next day I added a handful of pecans, some chia seeds and flax seeds to the salad for some extra protein to fill me up as there just wasn't enough salad on its own.  The veggies had not gone soggy sitting overnight in the fridge either, which is an extra bonus.  I've seen other versions of carrot salad out there made with jello. I just don't want to be eating artificial colors in my salad, no matter how good it may taste!!! This one has fresh ingredients. Nothing artificial here.  Any of the ingredients can be easily adjusted to your liking. If you don't like tomatoes, don't add them in!  A little bit of grating and chopping and your done. This is a nice alternative to the many lettuce based salads out there.

CARROT AND BROCCOLI SALAD


INGREDIENTS 

1 broccoli crown, cut into bite size pieces
1 tsp. salt
1 Tbsp. olive oil
3 carrots, grated (good for you if grating by hand,
 but using a food processor is wayyyy faster)                                              
1/2 of a red onion, finely diced
handful of grape tomatoes, cut in half
1 apple, cubed  (i used a mutsu apple,
 use your favorite sweet apple)
1/4 cup raisins
1/4 cup sunflower seeds
1 tbsp. freshly squeezed lemon juice

INSTRUCTIONS


Place the broccoli in your desired serving bowl.


Toss in the salt and oil to soften broccoli a bit, while you are preparing rest of fruit and veggies.


Add in all other ingredients and toss together.


Now, wasn't that easy?


Salad serves 2 to 3 for dinner or up to 6 as a salad/side dish.
Enjoy.


I ate this nappa salad for the first time a few years ago at a neighborhood barbeque.  This bowl of salad was the one that was empty first.  I, along with everyone else,  liked it so much, I had to have the recipe.  I prepared this salad for many dinner parties after that. Never failed to come home with an empty bowl. The only downfall is that it's LOADED with fat and sugar.  The original recipe called for 1cup of sugar in the dressing and 1/2 cup of butter in the topping. Becoming more health conscience over the years, I've since cleaned it up to be a little more hip, belly and thigh friendly.


NAPPA SALAD
My cleaned up version

INGREDIENTS

1 head nappa sliced into thin strips
2 snack containers mandarin oranges (one for the dressing and I drink the juice from the other for a treat)
1/4 red onion thinly sliced
3 green onions thinly sliced

topping ingredients
1/3 cup chopped pecans
2 tbsp or so of sesame seeds
1 Tablespoon butter
1 Tbsp honey

dressing
juice from 1 snack size container mandarin oranges
1 tsp soy sauce
1-2 tbsp. honey (enough to thicken dressing a bit)
2 tbsp or so light olive oil
splash maple vinegar
salt and pepper

INSTRUCTIONS

Whisk the mandarin orange syrup, soy sauce, and 1 tbsp. honey and vinegar together in a fancy serving bowl.  Whisk in olive oil. Whisk in more  honey to emulsify and thicken up dressing if needed.  Whisk in salt and pepper to taste.

Place all salad ingredients on top of dressing, BUT don't toss.

Place all topping ingredients in a small fry pan on med heat and stir occasionally until pecans are fragrant and lightly browned.  Cool slightly and place on top of salad.  BUT do not toss.

About 30 minutes before serving you can toss the salad.  Tossing too early will cause the nappa to wilt a bit.
Enjoy.


Eat Well

Tuesday, 3 April 2012

MORE NATURALLY COLOURED EASTER EGGS

Continued from my previous post....
I've done more egg colouring myself and what I've come up with are some interesting results.
I tried the beet dye with 1-1/2 Tablespoons of vinegar and left the boiled eggs in the dye for about 24 hrs.


The eggs did take on some dye, but more of a brown-pink color. Unlike the actual deep burgundy colour of the dye itself.


This was the red cabbage leaf dye.  I made it by boiling about 3 large cabbage leaves in 2 cups of water and letting them soften.  After cooling a bit I poured only the dye into a jar and added the boiled eggs and 1-1/2 Tablespoons of vinegar.  They were in the dye for about 24 hrs.


This one is my favourite.   Wouldn't have believed that purple cabbage could make such a nice  blue. When the eggs first came out of the dye, they were the bright blue colour like the egg to the bottom left of the bowl.  As I let them sit out to dry, they took on more of a teal shade, which I find to be very nice, and interesting that they could even change colours after merely drying. Really cool!


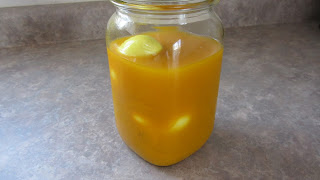
Such a nice yellow tone the turmeric makes.  In this jar is 2 Tablespoons of  turmeric I boiled in 2 cups of water.  I added 1-1/2 Tablespoons of vinegar to  the dye into a glass jar, and placed the boiled eggs in too.  The turmeric settled to the bottom of the jar, so every time I went into the fridge, I gave the jar a twist and gentle shake to move around the colour.


This jar has been moved and shaken so the turmeric solution is all over the eggs.


The eggs were in this jar for about 24 hours and took on a pale yellow hue.  Not as dark as the colour in the jar itself, but still a nice yellow.
I actually expected more of a brighter colour.  These turned out more pastel.


This jar has the about half package of frozen spinach leaves that were boiled with 1 Tablespoon of greens+ powder. I poured the whole works into the jar with the boiled eggs and 1-1/2 Tablespoons of vinegar. These were in the fridge for about 24 hours too.  As you can tell, the eggs still seem very white.


The eggs out of the jar have a very pale dark green colour.  I didn't think the eggs would pick up the dark green of the spinach, as it hadn't dyed the water very much anyway.
But the eggs did still take on a bit of the green.


Here's my bowl of naturally coloured Easter eggs.  Blue, yellow, pinky-brown and pale green.  I guess not too bad considering these are all naturally made.  I really love the blue/teal colour the best.  It came out the most vibrant of all of the colours.  The yellow I like the second best as the color did take quite nicely.
Maybe next year I'll have to try something different to get more vibrant colours to adhere to the eggs. Any suggestions are welcome.

I think that's enough eggs for this year.  Lots to eat!
Hmm.... devilled eggs, egg salad sandwiches, sliced eggs on a spinach salad....
...no problem,  they'll all be gone in no time.


Eat Well.

Monday, 2 April 2012

FOOD MATTERS

What we eat really matters.  Our good health is our only way of living disease free. How we get and stay healthy is all up to us. These videos are such an inspiration to me and what I want my life to be all about.  I have always thought that the skinny model look was the way to be, but today that outlook of myself has totally changed. Today's women don't need to be skinny, we need to be healthy.  And when we are healthy, we radiate with glowing skin, shiny hair, a thin body that's toned and we emanate happiness and purity.  That would be the ultimate woman of today's world in my eyes. Therefore I had no choice but to post these videos here in my blog for everyone to see.
This first video is the trailer from the movie FOOD MATTERS.  Very inspiring.


David Wolfe is a true inspiration in the Raw Food world.  This video is about optimal health and wellness and  how to achieve it all by ourselves.  By the choices we make in life and especially how we eat.
This second video is an interview with David Wolfe. 


There are many more videos about this movie and several interviews that were done with different doctors and health gurus, just go to foodmatters.tv  and you can see a 40 minute preview to the movie FOOD MATTERS.  You just need to type in your name and email address and your set. 
Interesting and again inspiring.  Especially to hear all about the pharmaceuticals. 
I'm planning on going to the library to borrow this video so I can see the movie in its entirety.
Also I'm wanting to check out the 7lbs in 7 days book by Jason Vale. A book all about juice cleansing.  I love making my own juice in my juicer and I love making my own tasty smoothies in my blender. I'm sure this book will come in very handy and inspire me with new delicious creations.
I'll let you know how it goes......


An example of one of Jasons juices is in the second video below. The first video is about why juicing is so good for us. Jason Vale is very enthusiastic about juicing because it has cured him of asthma, psoriasis and his weight problem.


Eat Well.